 You can also use
some of the methods described here to move selected items or highlighted
nodes on your drawing by fine increments. This feature is called Nudge.
You can also use
some of the methods described here to move selected items or highlighted
nodes on your drawing by fine increments. This feature is called Nudge.This tutorial illustrates the methods of accurate cursor movement, which allow you to draw exactly.
The functions listed in this section can be used to position the cursor in preparation for doing something. For example, you can move the cursor to an exact position and then draw a geometry line through that position.
Alternatively, they can be used while you are drawing to precise measurements. For example, you can use them while you are drawing a line to ensure that the line is the right length or ends at a particular place.
You can also use
some of the methods described here to move selected items or highlighted
nodes on your drawing by fine increments. This feature is called Nudge.
The items discussed are:
Move an exact distance up, down, left, or right.
Move diagonally.
Move an exact distance in a specific direction.
Lock cursor movement to an exact angle (Ortho mode).
Move to an exact coordinate location on the screen.
Move exactly to the screen centre.
Move exactly onto an existing part of the drawing.
If the cursor is in Select or Select Jump mode, the method described here moves selected items on your drawing. If the cursor is in Node mode, it moves the highlighted node. If the cursor is any other mode, only it is moved.
This feature is called Nudge and is useful for moving selected items and highlighted nodes in very small, precise increments.
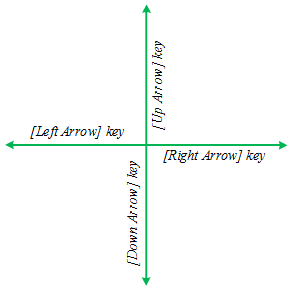
To move the cursor, selected items or highlighted nodes an exact distance up, down, to the left or to the right:
If you are using the arrow keys on the numeric keypad, ensure that your [Num Lock] light is off.
If you press the [Shift] key at the same time as you press an arrow key, the cursor, selected items or highlighted nodes automatically move in the direction indicated by the arrow. They move the same distance that you specified the last time you typed how far you wanted to move in that direction.

Type in the distance you want to move. This distance is measured in the units that you have chosen in the Drawing Settings.
When you have typed the distance or calculation, click Enter or press [Enter].
See Select
and Selection Filters
in the Edit Menu for details on how to select entities and objects.
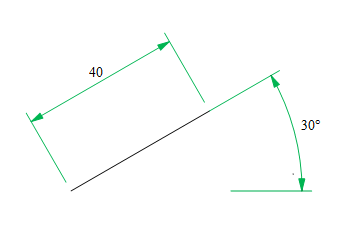
This function can be accessed in three ways:
Press [P].
Click the Polar jump icon  on the toolbar.
The Polar function requires you to enter a distance and an angle. The way in which the angle is measured, e.g. anti-clockwise from the three o'clock position, is dependent on the way you have set up the Angular Format in the Drawing Settings in the Settings menu.
Locking the cursor to a specific angle allows you to draw lines at a precise angle.
You can draw horizontal and vertical lines using the arrow keys - see Move an Exact Distance Up, Down, Left or Right earlier in this chapter.
Enter the function you want to use. For example, choose Draw ► Chained Line and enter the first point of the line.
Press the grey [+] key on the numeric keypad.
Click the Set Square icon.
You are now able to draw horizontally or vertically, and a diamond appears at the end of the line you are drawing. You are able to move the cursor away from the end of the line you are drawing and snap it onto another entity, forcing the line you are drawing to end in line with the other entity.
To draw at a non-horizontal angle and its orthogonal, rather like using a set square:
Select Tools ► Lock Cursor and choose the angle at which you want to draw. Your chosen angle is then displayed at the bottom right of the screen.
To draw at your chosen angle, enter the function you want to use. For example, select Draw ► Chained Line and enter the first point of the line.
Lock the cursor as described above. The cursor movement is locked to the specified angle. Once you have locked the cursor, there are two methods of drawing accurately.
While the cursor is locked, you can draw lines of accurate length using the Arrow keys. For example, if the cursor is locked at 60 degrees, the four arrow keys move the cursor in quadrants of 60 degrees.
The cursor automatically unlocks when you exit the Line function. Your chosen angle is still displayed at the bottom right of the screen until you select Tools ► Lock Cursor ► Unlock.
To unlock the
cursor manually, use Tools ► Lock Cursor ► Unlock.
To move to a specific coordinate location on the screen, for example the coordinate position 60 –15, use the Coordinate jump.
This function can be accessed in three ways:
Press [U].
Select the Tools ► Jumps ► Coordinate function from the menu.
 .
.Press [H] to move to the screen centre, whether your screen is magnified, de-magnified, zoomed or not zoomed.
There are two ways to move exactly to an existing part of a drawing:
A Jump moves your cursor exactly onto an existing part of the drawing, for example onto the end of a line. It is performed on demand. If you want to accept the point that you have jumped to, for example as the first point of a line, or as a point through which a geometry line must pass, etc, you must press [Enter] or click. If you move your mouse off the exact position before you press [Enter] or click, the point is lost and you have to perform the jump again.
When you are in a Snap mode, the cursor moves exactly onto an existing part of the drawing, and the point that is snapped onto is accepted. This action is performed each time you press [Enter] or click. A Snap mode is useful if you must continuously snap onto the same type of point, for example if you are drawing lines between grid points and must continually snap onto those grid points. The Snap mode saves you having to jump to the point and then accept it as two separate actions.
Another method of accurate drawing is to use geometry lines and circles. These can be used to determine the position of a point, or as guidelines to trace over.
You can also define a regular or isometric grid and use the grid points to help you draw.

To create a grid, use the View Settings function.
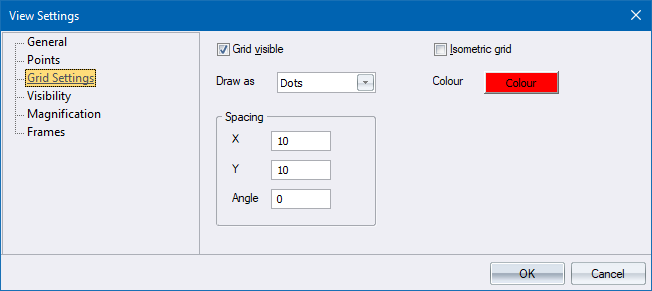
Once you have created a grid, you can use the Grid jump, the Grid snap or the Grab All snap to jump accurately to the grid points.